Former arts teacher now living in the world of technology.

World Music

Just finished up my world music unit with 3rd grade. At this point it has taken up most of the semester. However, classes have not been super steady this year due to transportation issues and still dealing with COVID. Going back to look, this whole unit takes 9 lessons to complete (10 if you let them play bingo twice).

This all started with a game I purchased years ago called World Music Bingo by Cheryl Lavender. You can grab it on Amazon or from stores like West Music and Music in Motion. The game features sound samples for 24 instruments from around the world. When I taught this in middle school I only used the bingo game but as time went on and technology became more prevalent in teaching I thought that it would be pretty amazing if the students could see the instruments as well as hearing the sound samples. So I created a Google Map with videos of all 24 instruments for the students to see. All of the videos are from YouTube but I decided to download and store them in my Drive because of the advertisement issues (some adverts that pop up are completely inappropriate for kids) and to avoid the videos becoming inaccessible. I feel like this would fall under fair use.

So, anyway, the map is here if you’d like to check it out. If you teach older students they can explore the map themselves, mine weren’t ready for that so I showed them clips of the videos on my board as a whole class. Some of the videos are quite long, when I am using it in class I only play 30 second snippets but the map is linked on my website for students to view anytime if they would like to see more.

As far as the lesson times I would guestimate about 30 minutes per lesson. My classes are 45 minutes long but I also do a daily rhythm activity that takes time out of the class as well as transition time, getting supplies etc. so the actual lesson part is a safe bet at 30 minutes. Of course, that also depends on your students and how they work.

Lesson 1: For lesson one I introduced students to the map and explained that I was going to show them instruments from around the world. We had the usual conversations about respecting other cultures and that the instruments, people, clothing and even locations may seem strange to them but they are just different from what we are used to. I passed out this simple worksheet for them to fill out as they watched and listened. The point of the worksheet is for them to write something that will help them remember the sound of that instrument when they hear it again in the bingo game. I explained that there are no wrong answers and that they could write whatever they want. If it reminds them of a scary movie, someone hitting a desk with their pencil, horses galloping or Moana that’s what they should write. For this lesson, we usually get through the first half of the instruments.

Lesson 2: Lesson two was showing the students the second set of instruments and allowing them to finish the worksheet.

Lesson 3: Lesson three was a review day. Especially this year with kids being absent due to COVID issues I hardly ever have a full class. I used lesson 3 as a time to go through and ask the students if they would like to see any of the instruments a second time or if they were absent I’ll play the ones they missed. There is usually some time left after this so we do a sort of bingo introduction where I’ll play several instruments and see if they can figure out what they are.

Lesson 4: Lesson four is bingo day! We spend the whole class playing the bingo game and they can win prizes for getting bingo. If the class is super good and has fun I’ll play bingo for two lessons.

Lessons 5 – 8: Lesson five began by learning about the Hornbostel–Sachs method of instrument classification. This is my first year at this school and I assumed my 3rd graders would already know about Western orchestral classification but they did not so I did add that to my presentation. The presentation is here. The first day we briefly reviewed the orchestra and then I defined the careers of musicologist and ethnomusicologist and talk about how the orchestral classification doesn’t work for all instruments. Then I began with the aerophone classification. The students used a type of note-taking called Frayer notes which was introduced at our school during a staff development session this year. I really like it. My Frayer notes are available on TpT. We first talked about the definition, which I gave them to copy, then we moved to examples. First, I asked them to look at their world music map worksheet and see if they could name 2 or 3 examples of an aerophone. The aerophone examples slide is linked to a Google Jamboard where I write the names of the instruments they provide so the whole class can see them and add them to their notes. Then I showed them 2-4 instruments in class by walking around to show them the instrument and then demonstrating how it is played. They give a thumbs up if it IS an example of an aerophone and thumbs down if it is NOT. These are just classroom instruments or instruments I own. If it is an example, I add it to the Jamboard, if not, I set it aside for the non-examples section. Once we have filled in about 5 examples, we do the same for non-examples. I wrote the names of the instruments I showed them that were not aerophones and then they looked for non-examples from their world music map worksheet.

For the characteristics section we discussed how the instruments are played. So, for example, with the aerophones they are played by blowing, pushing, and spinning. Once the notes are complete I show them a final example (in the presentation) of an unusual instrument from the category that they have most likely never seen before.

The same process is used for the remaining categories of membranophone, chordophone and idiophone. I did each one in a separate lesson, although the rest were shorter because I don’t have to worry about the orchestra review I still like to cover each one separately. Sometimes that means filling some extra time with a brain break or other activity. After I covered the idiophone section they had a classification competition where, as a group they had to use these poster boards and instrument pictures to categorize them into each section. The first group to finish got to pick prizes out of my prize box.

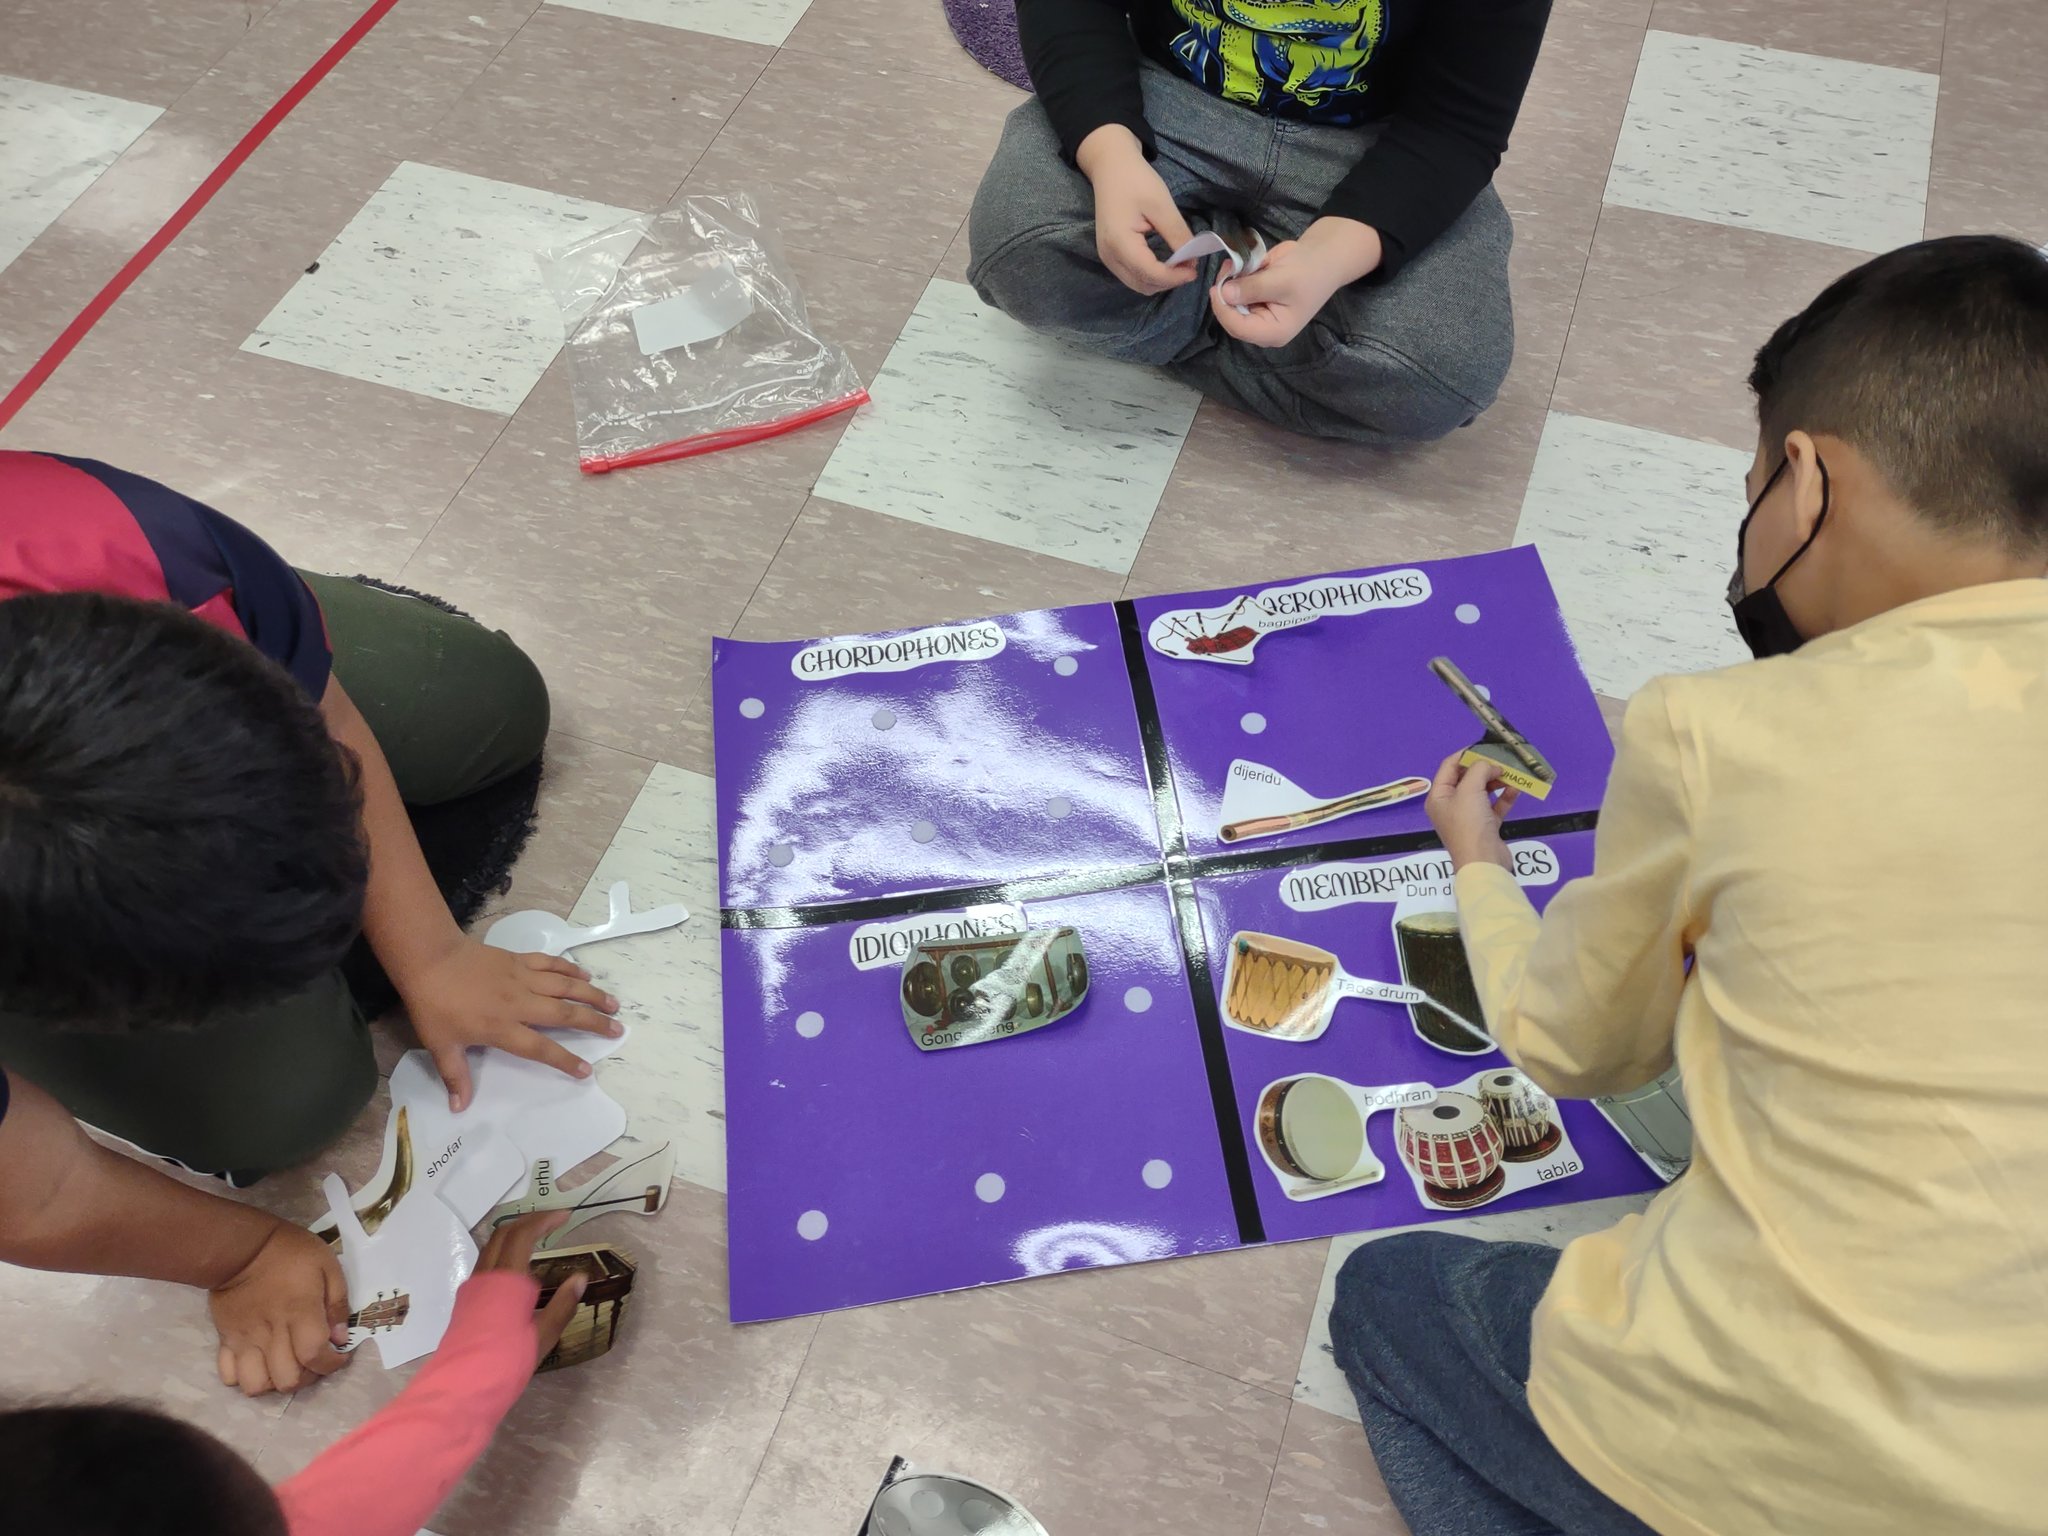
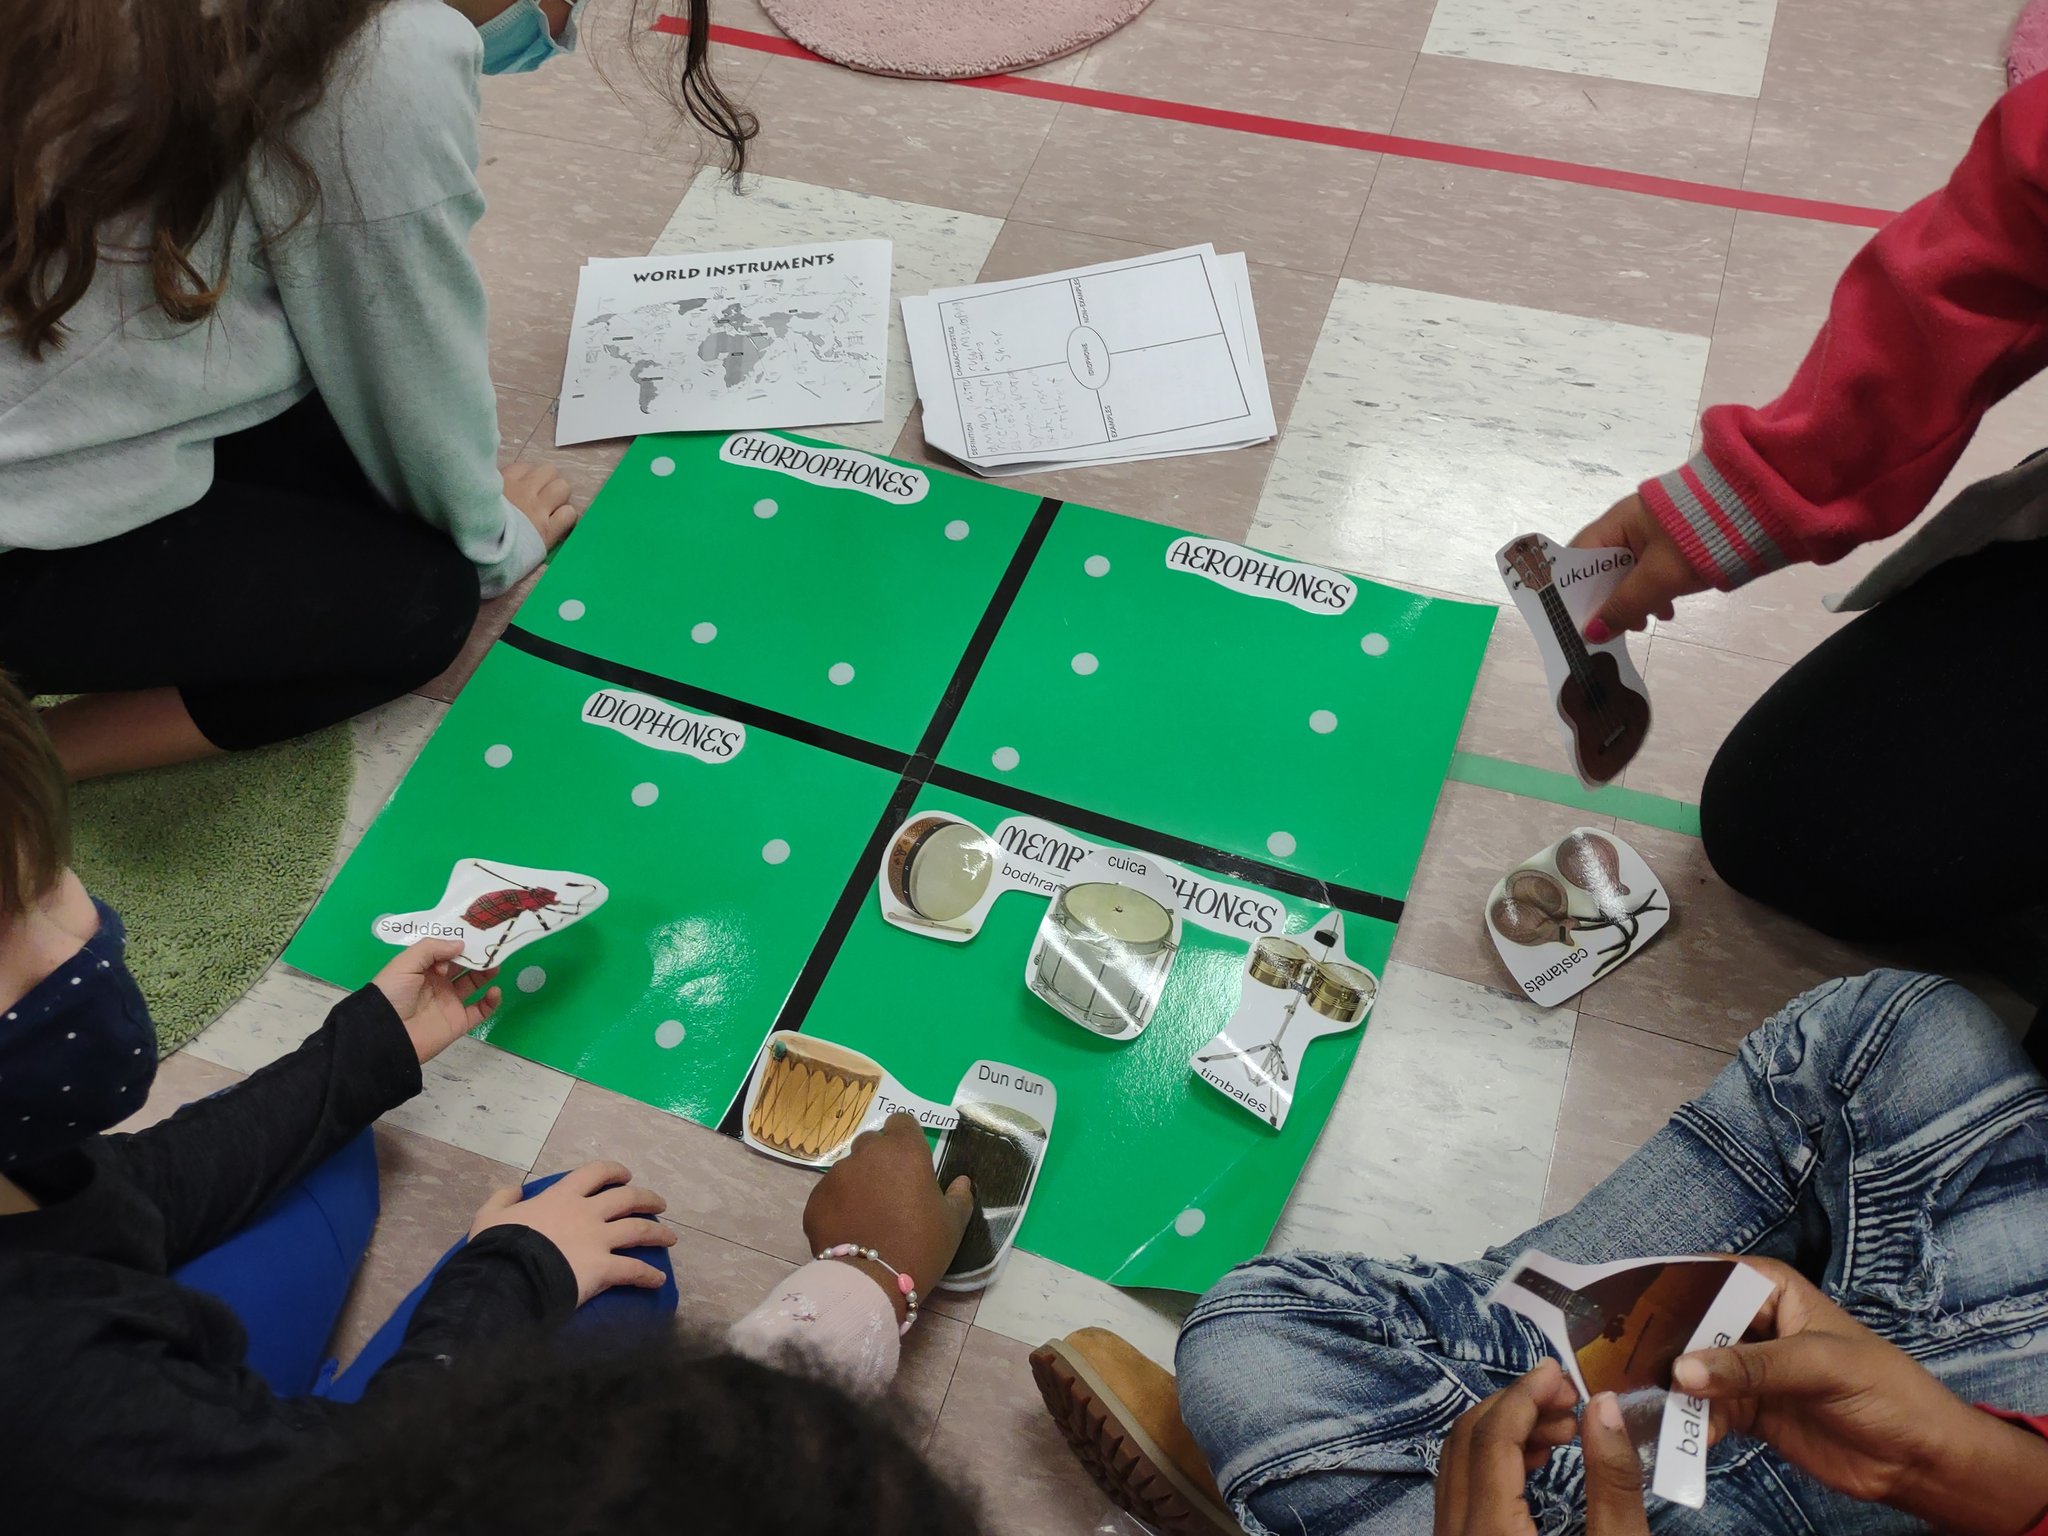
I made these boards myself. Found pictures of all of the instruments from the world music game online and used them to create the velcro charts. The kids really seemed to enjoy this and it was great to hear them explaining to their team members why they put each instrument under each category.

Lesson 9: The final lesson is a culmination of all they have learned. I set instruments up all over the classroom, four instruments for each classification and they used this worksheet to classify the instruments. If they are able to complete all of the classifications successfully they get one of these buttons (I print them out on sticker paper).

This is really a great unit and I will definitely make this a recurring learning activity for my 3rd graders. I haven’t taught it for years so it was truly fun to bring it back, update and rearrange it to work for my elementary students.

I’m back! (I hope)

I’ve been pretty lax keeping up with my blog the last few years. I am hoping to start keeping it up again. For the past 10 years or so I’ve been working in the technology field and there are so many fun and cool lessons I should have written about but life got in the way. Now that I am back to working as a traditional 10 month teacher I may have time in the summer and go back to write about those lessons, I really hope I do because we did some great things!

As of August 2021 I am back in the music classroom. I’m happy with my choice but it’s been so long since I have taught music (especially elementary) that I feel like a first year teacher all over again. I have some great things to write about but I’m also never shy about sharing my “learning experiences” as well so there should be quite a variety of things going on.

My next post is going to be about my World Music Unit. I used to teach this very successfully in 6th grade but I wasn’t sure how it would work in elementary. I randomly chose 3rd grade to try it out and so far it has been AMAZING! We will be doing the last lesson in the unit next week and I cannot wait to write all about it!

For today though, I want to talk about the Rhythm Train. This is something I learned from my very first interning teacher when I graduated from college. I’m super sad right now because I can’t remember her name and I’d love to get back in touch with her to let her know I’m still using it. Now, mind you, I’ve been busy so my current train has no wheels but I figure I can add those on next year.

What the Rhythm Train is, is a rhythm activity that I use to start every class in 2nd – 5th. It starts with one train car and then a new one is added each week. By the end of the year, it will go across most of my classroom walls. Each class we go over the new rhythm and then perform the whole train. Students are tested once each semester on a performance of it which they can do one on one with me or in front of the class if they are feeling brave. I’m happy to say I have more than half of my students feeling comfortable enough to do the test in front of the group. I think that says a lot about my classroom atmosphere.

Anyway, for the students that need a little more practice, I sent a video home to parents through our communication system so the students could practice at home. Here’s that video so you can see what the Rhythm Train looks like.

It’s Been A While

So, as excited as I am to be on this classroom adventure my frequency of posting is not what I thought it would be.  The reason?  My schedule.  I teach at a year-round school with four tracks of classes.  My K-2 students are on a 7-day rotation and my 3-5 are on a 6-day rotation.  The last time I taught elementary school I saw my classes on a regular schedule of once per week.  This schedule I have now is insane!  We started in July and now, in February, due to assemblies, field trips, workdays, track outs and snow days, there are some classes that I have only seen 9 TIMES!  9 times from July to February, it’s hard to believe.  I’ve even been subbing for myself during my track out weeks (I am an 11-month employee so there are certain weeks that I am required to track out) and I still can’t beat the system.

It is a bit frustrating to say the least.  I see blog posts and tweets about what great things teachers are doing with their students and how advanced they are in their lessons and I used to get really upset but now, I realize that I cannot compare myself to a teacher who has seen their classes two to three times more often than I have seen mine.  So, the posts about our projects will be coming, but not as often as I would have liked.

This has truly been a learning experience and my days are never boring.  A typical few days for me looks like this.

schedule

So, projects that I thought I would finish in a couple lessons end up taking several weeks (or months) to complete and that’s pending that the kiddos don’t have their own track out in the middle of the unit.  We have four months left in this school year and I feel like I have barely started.

I’m working on the idea that my teaching will not end in June and start again in July, it will be continuous throughout the student’s time at this school.  There are units that I will repeat, for example, I cover the earth and the universe lessons in 1st grade but, for the most part, I will just continue working with the students and improving their technology skills and knowledge over a 6-year timeline rather than worrying about what happens from year to year.  This is a new concept for me and it will probably be one 6 year cycle before I can really say how it works.  I guess you gotta have goals.  🙂

Had my first Kindergarten classes as a technology teacher this week and it was an experience.  First of all, I should note that I currently do not have a class set of computers in my room.  Due to some changes at our school, many of our classrooms needed computers so I offered that they could use the ones in the lab.  I have an ulterior motive, of course, I’m trying to get some flexible seating and make the lab a truly creative space.  I’m happy to not have rows of tables and desktop computers.  But, for now, I am doing lessons about technology but not necessarily using technology.

Anyway, last week I got 10 of the desktop computers back because they could not be utilized properly in the area they were sent to.  At first, I was a little annoyed but did not have a choice in the matter so I now have 6 tables and 10 desktop computers in the room.  It got me thinking about what I could do with them.  Luckily for me, our K classes are at right around 20 kids so it is the perfect number to be able to split the classes in half!  My idea was, for the first lesson, to give students in one-half of the group an activity they could pretty much do on their own and then be able to help the other half practice logging into the computers.

I decided that I needed a fun way to reinforce the crazy, long, computer numbers the students have to use so I searched the internet and found handwritingpractice.net.  It was perfect!  I was able to create awesome, traceable and colorable worksheets with the student’s names and computer numbers.  It took hours to create and print individual worksheets for each child but once they were done I was super excited about using them.  Here’s an example of what they looked like.

DotsLines

I spent the first part of class reviewing some basic tech knowledge for the technology bingo game they will eventually play and then split the class and each group spent about 15 minutes on the worksheets and then 15 minutes on the computers.  Every time they were able to log in to the computer correctly I gave them a sticker (which they LOVED) and they were also super excited that they got to keep their papers and take them home.

The first few classes I had were exhausting!  The students were so needy and there was only one of me to go around.  I felt like I was in the middle or a tornado, hurricane and tsunami all at once.  However, as the week went on they got better.  The class I had yesterday was EXACTLY how I pictured the lesson would go.  After yesterday’s class, it dawned on me that when I saw some of my first classes they were experiencing their very first days of school so I have a better understanding now of why things were so crazy.  As the week went on, the students got into more of a routine and each class was better than the next.  I’m looking forward to our next lesson when all of the classes have been in the school routine for a while and should be easier to work with.

I think I will do this same process again next year although I might wait until lesson 2 when all of the classes have a better sense of routine and expectations.

Sitting on my couch on Friday night celebrating the end of a long week.  A great deal of learning took place this week and I can tell you, it wasn’t just the students!!

It has been around 13 years since I have taught in an elementary classroom (and that was music, not technology), my job as an ITF (Instructional Technology Facilitator) allowed for some work with students but more often than not it involved team teaching or special sessions.  Now I’m with students ALL DAY LONG as our school’s technology specials teacher.

I do have a theory that anyone in a non-teaching position should have to go back to the classroom every 5 years so they don’t forget what it is like “down in the trenches”.  I’m living proof that this theory should become practice.  I’ve worked as an ITF for almost 5 years exactly and I must admit, there are a lot of aspects of being in a classroom that I had gladly forgotten about.  I’m sure this experience is going to make me a better ITF when I have the opportunity to continue on that career path.

All in all the first week was pretty good.  The first lesson was fairly straightforward, introduce myself, explain some of the changes in the classroom, talk to them about our new 3D printer and go over rules and procedures.  For 3-5 I did a getting to know you activity where the students answered 4 questions, each on a sticky note.  I had posters around the room that had one of the questions on them and they got to get the wiggles out by getting up and putting their sticky notes on the posters after each question.  Once the questions were answered I had volunteers take them off the poster and read them aloud while I typed the answers into a word cloud generator.

My point with this activity was to get some general information about the students for myself and for them to learn about each other.  The questions were:

  1.  What do you know about technology?
  2.   What do you want to know about technology?
  3.   What do you love about technology?
  4.   What could you teach someone else about technology?

Here are a few examples of how the word clouds turned out.  I found the responses quite interesting and am already thinking of lessons I can create that focus on what the students are interested in.

First Day Questions 3-5 (2)

First Day Questions 3-5 (3)

During the lesson, it was a little challenging to keep some of the student’s attention while the other students were reading out the answers but they were always excited to see how the word cloud would turn out and guess which words would be the stand outs.  All in all, I can label 3-5 as a success.

We did not have kindergarten classes this week due to staggered entry and I am certainly glad for it.  I learned the hard way that I need to plan much better for the younger students.  The same basic lesson applied to 1st and 2nd.  Introduction, rules & procedures, talk about the new 3D printer and then I planned for them to review for the music bingo games they will be playing during the next lesson.  Yeah, that didn’t take anywhere near 45 minutes.  With the first class, I think I had 20 minutes left with nothing planned. :O      I had brought my iPad (I guess subconsciously I knew I’d need it) so I quickly used Reflector to project the iPad app PreSchool Galaxy to review colors, numbers, letters, and shapes.  This did not work with the interactive SmartBoard but I secretly touched the iPad when the kids touched the board so it worked out well.

After that, I had to do some serious thinking.  That app was really not at a level that challenged the students at all.  I needed to find something that complimented my curriculum and possibly something to reinforce what the students are learning in the regular classroom.  I remembered a video for young kids about the Cyber 5 so I looked that up and decided that would be a great introduction to internet safety.  Unfortunately, the video only added about 6 minutes to my time.  The video was from ABCYa.com and when I had more time left I just started looking through the site.  I found several great games for the students to play that reinforced things they were learning in the classroom.  Their favorites are KittenHop and Consonant Blends.  (Although the sound of the bee buzzing in that last one when it first loads is enough to drive me crazy!)

So, all in all, I can say we lived happily ever after.  Took a lot of “failing forward” to fix those 1st and 2nd-grade lessons but I’m really happy with what I ended up with.  I have a really cool idea for K next week.  I hope it is as fantastic in reality as it is in my head.  We’ll see!


Technology Teaching

So, due to some class size mandates going into effect in my great state of North Carolina my ITF position has been eliminated at my school.  Luckily, I still have a job as a technology specialist but it will be tying me down to a daily schedule and our school population is so large that it is not even a super consistent schedule.  I’ll be seeing my students once every 6 days and that is pending no snow days, field trips, assemblies or school activities.  I’m also disappointed that I won’t be able to do as much team teaching and technology projects with the staff and students.  I’ll make myself available before school, after school, during lunch and planning but it still will not be the same as my flex schedule.

However, I am trying to look at things optimistically.  There are some advantages to seeing every child in the school, even on a semi-consistent basis and I’ve already been lesson planning–hence the reason for this particular blog post.  One of the issues I have not had to deal with as an ITF is getting a sub when I am out.  Depending on the sub and the situation technology can be difficult to leave with a sub as, usually, they are not equipped with the knowledge to help the students with logging in or editing, etc.  So I’m working on some lessons that will be beneficial to the students but also easy for a sub when I am on track outs.

So, I proudly introduce – TECHNOLOGY BINGO!  I’m so excited and thought I would share what I created.  There is a fantastic FREE site called Bingo Card Maker from eslactivities.com.  They allow you to create bingo cards using pictures.  I created one set of cards for K-2 where they identify different browsers, icons and equipment and then one for 3-5 that is a little more difficult and includes keyboard shortcuts.  I’m sharing the files here.  Feel free to download and use.  I think this is going to be so much fun!

When I use bingo I laminate the cards and let the students use Vis a vis markers to mark their spots.  After each game, I spray them with water and the kids erase them.  (Mostly spray the cards, sometimes the kids too!)  It works very well and my cards stay in good shape.

I hope you enjoy these games as much as I plan to!

K-2 Tech Bingo                                    Technology Bingo 3-5

Since I noticed our students had access to the My Maps feature I have wanted to find a way for them to use it.  Our 3rd-grade students do a social studies project where they research different countries and I thought this would be the perfect way to begin working with this tool.  I have some great 3rd grade teachers who are willing to take the plunge with trying new tools so we gave it a shot.  The students did their research with the teacher using Culture Grams, which is a great tool provided by our district and filled out the required information into a brochure template that I created in Google Drawings.  The students took it upon themselves to add their own personal touches, which I absolutely LOVE, and when they were finished they took screenshots of their work and we added all of the brochures to one Google Slides presentation to share with parents.  Here are a few brochure page examples.

Once the brochures were complete the students were given the link to the teacher’s Google Map through Google Classroom.  The students created a marker for each of the areas on the brochure.  They titled the marker, added a description with information from their brochure and then added at least one picture that showed that particular topic.  It was awesome to see all of the students working simultaneously on one map and adding all of their markers and information.

If the students finished entering all of the information early they had the opportunity to add more photographs and to personalize their markers by changing the icons and colors.  They were so focused and engaged in this project it was a joy to watch them work.  When they finished, they took the time to visit a classmate’s country and learn about that country by reading their classmate’s informational markers.  We then embedded the map on the teacher’s website so the parents could see the students work.

This was a great project and I hope to help teachers do it again with students next year.

Last year we had the opportunity to introduce our students and teachers to Google for Education (or G Suite–I never remember the name change).  For older students, grades 3-5 the transition was not too difficult as they had used word processing and slideshow presentation software before, but the collaboration element is new for ALL students.  Here are some ways I discovered that made that process easier using Google Docs and Googe Slides.


undo-features

Undo is your best friend!

One of the first things I introduce the students to is the undo button.  It never fails that when groups are collaborating on something that someone gets overly excited and accidentally deletes slides, paragraphs or in some cases the entire document.  When a student makes a mistake, instead of going into panic mode, they know that they can hit the trusty undo button and no mistake is too big to fix!


colorsHave students use colors (or different fonts).

There is always an issue with group work where certain students contribute more than others.  My media specialist suggested that the students choose a color to type their work so we could see, at a glance, where each child contributed to the research.   The students enjoy this as well as it gives them a little choice and ability to personalize their contributions.


2nd GradeUse tables.

When using Google Classroom with students in grades 1 and 2 I found it much easier to provide tables for the students to answer the questions.  This picture is a 2nd-grade word problem that the students must answer in three steps.  Rather than leave it open for students to type anywhere on the document, I created a table with clear spaces where the students could enter their answers.

 
CaptureCreate Templates.

Especially when our 1st and 2nd-grade students begin working in Google Slides they need guidance as to where and how they need to enter their information.  I create templates for their projects and when they work in groups each student is assigned certain slides to work on so numerous students are not trying to work on one slide.  They are introduced to working together on one slide when they have to add their names to the introduction and list their sources.  The only thing to be aware of when using the templates is that the students need to be aware that they need to have a blinking cursor in the text box for them to remove the directions and type their own work.  Sometimes they will click just once on the box and hit backspace to delete the text and accidentally delete the text box.  Once we made sure the students knew to have the blinking cursor everything was great.


Use the revision history.Capture w

Even with all the above tips you still sometimes need to see the nitty gritty of what is going on with a document.  It even happens that in a group of students they don’t even realize who deleted all of their slides so you need to look at the revision history to see which student needs to use the undo button.

I Have Been Remiss

So, it has been quite a long time since I have posted anything here.  In that time I have started a new job as an ITF at Holly Grove Elementary School in Wake County.  I absolutely love my job but things are crazy busy and I’m afraid my blog has taken a back seat.   I have so many wonderful things to share and I promise myself I will begin to take the time to write them all down.  Until then, I did want to take a moment to share a guest blog post I did for VoiceThread about Global Connections.  Please take a moment to read the post here.

I was cruising Facebook a while back and one of my friends posted the neatest collage of a baby.  It was in four sections, one was a video and the other three were just pictures.  I really thought it was cool so I asked her how she did it.  She introduced me to the app PicPlayPost.

Of course, I downloaded the app right away and started to play with it.  It reminded me of something from Sesame Street or The Electric Company and I thought a cool project to use the app for would be learning the alphabet.

I asked one of my Kindergarten teachers if I could try the app out on just a few of her students to test out how the project would work–it was fantastic!

I met with the students and allowed them to choose a letter of the alphabet.  We then took a field trip around school looking for things that started with the letter they had chosen and took pictures of those things with the iPad.  I then found some letters for them to color and when they were finished coloring we took pictures of their artwork as well.

In the final step the students made their videos where they introduced themselves, their letter, the sound their letter makes as well as the two words that start with that letter.  Here are some samples.

I will be leaving my current job soon but the teacher hopes to finish this project with the rest of her class so everyone gets to create a letter project and then she will display them on her website.  Fun stuff!